
Getting started with Telemanager is easy – simply follow the following steps:
Before Creating a campaign, you will first need to:
- Create at least one customer (Campaigns cannot be created without assigning a customer)
- Create a manager (although The Super Admin can also be the campaign manager)
Once done, follow these steps:
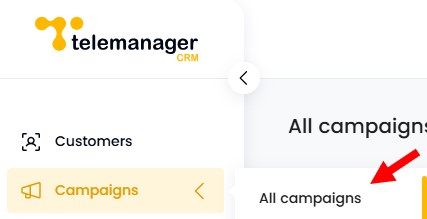
- Click on Campaigns in the right hand column, then All Campaign
- Click on “New Campaign”
- Fill out the campaign information section
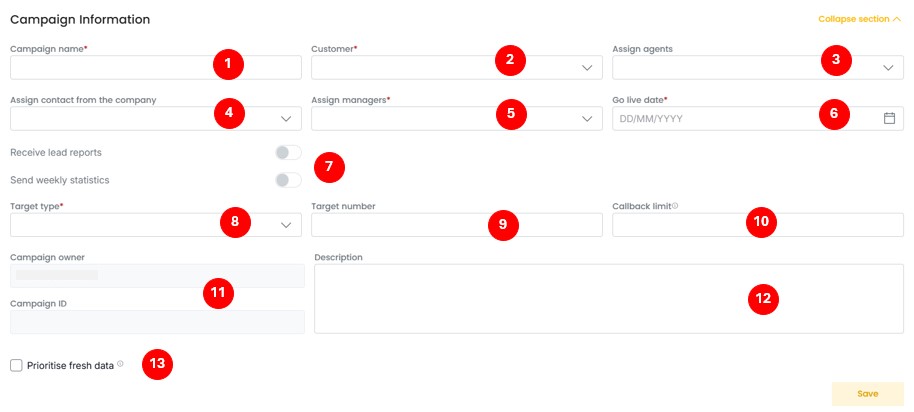
- Enter a campaign name (can be changed later) e.g. ABC Limited Lead generation
- Select the customer (the company you are conducting the campaign for)
- Assign agent (optional) – agents need to be added via the user tab
- Contact at your customer’s (2) who needs to receive the lead report and/or the campaign statistics (optional)
- Assign manager, the super admin (you) can be a manager) – add managers in the user tab
- Select a go live date for the campaign – the campaign will only be available to agent after this date
- Do you want your customer to receive Leads report and/or weekly statistics directly? If yes, select the respective options.
- Select target type – “Appointments” gives you the option to select a date and time / “Leads” is for RFQs, RFI etc.
- What’s the target for this campaign in terms of leads or appointments (e.g. 10) – this is to calculate progress.
- How many times do you want to call back each contact until they are automatically closed (can be adjusted later)
- Campaign owner and campaign Id are automatically populated
- Add description to help agents (e.g. This campaign is to set up appointment with companies interested in ABC.. Leads should be XXX)
- Prioritise Fresh data gives you the option to prioritise contacts that have never been called over those that are in the call back sequence.
Click save, the move on to the next section:
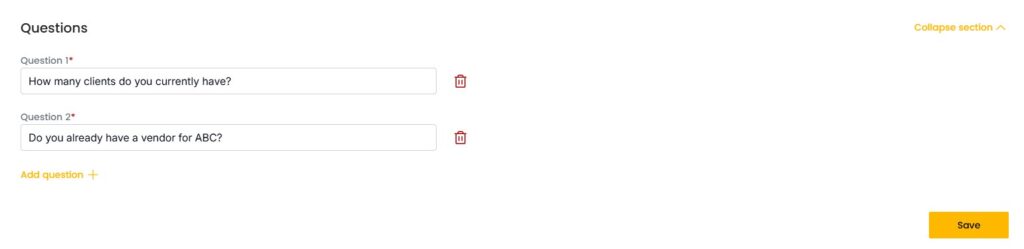
- Mandatory questions
Mandatory questions are uestions the agents need to ask and get an answer to in order to convert a Lead or an Appointment. They can be useful if you or your client needs a specific piece of information to proceed.
- Click on Add questions
- Add all necessary question then click save
- Import Data
To import data into the system, click on Import/Export, then Download template

Fill out the template, with your data, save (in CSV) then upload the file by clicking “Upload data”. Make sure you follow the following step to ensure the phone number don’t get corrupted by the file format.
Note that Data can also be uploaded one by one by clicking on “Add row +” at the bottom of the page
- Once done, hit save and your campaign is ready to launch!
Update 06/2025 – Good news! You can now use Excel format for your data upload – Simply download the template in XML instead of CSV.